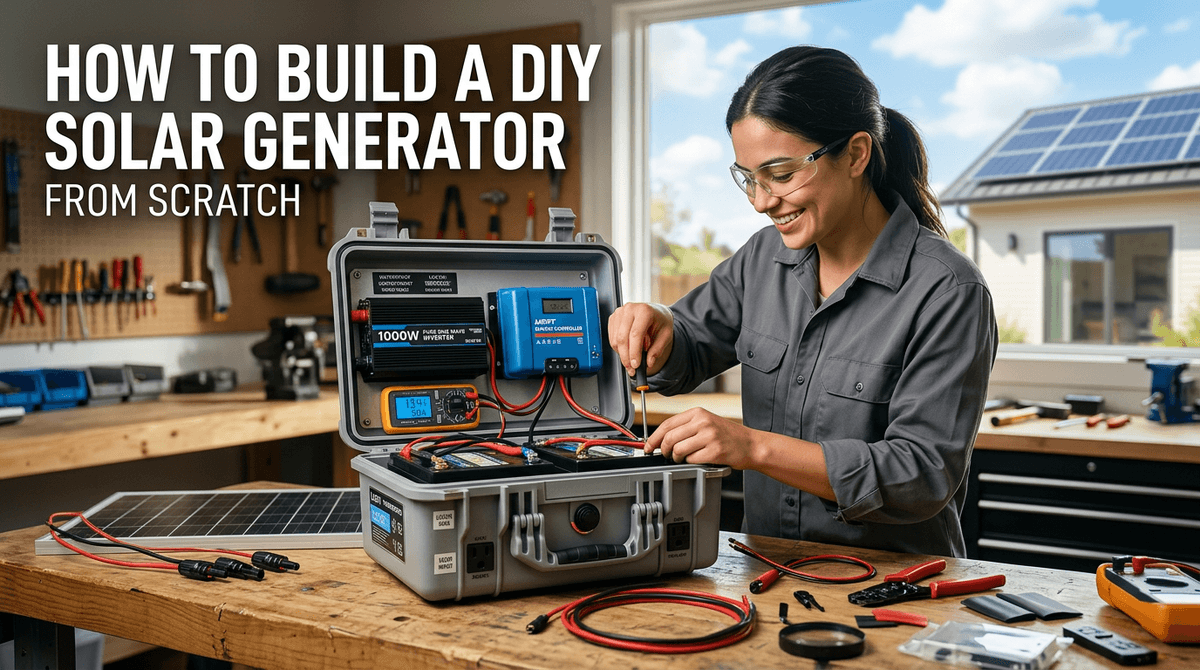
Building a DIY solar generator requires four core components: a LiFePO4 battery, a pure sine wave inverter, an MPPT charge controller, and a durable enclosure. By assembling it yourself, you can cut costs by up to 60% compared to commercial power stations while gaining the ability to repair or upgrade individual parts. The most critical steps are using thick enough wire (like 2 or 4 AWG for the inverter), installing proper inline fuses, and always connecting the battery to the charge controller before attaching any solar panels.
This guide is the hands-on track: enclosure layout, cable gauges, fuse placement, and the correct order to connect battery, charge controller, and solar input. You’ll still decide whether a boxed solar generator or a larger fixed DIY array fits your budget—use Solar Generator vs DIY Solar System for that framing and Solar Generator vs DIY Solar System for tiered price context before you buy parts.
Scope: portable “power station in a box,” not grid-tied home wiring. Anything that ties into premises AC, a transfer switch, or permanent outdoor runs should involve a qualified electrician and local code—this article stays on the low-voltage DC side and general inverter safety.
Defining the System: What is a Solar Generator?
A "solar generator" is a marketing term for a portable battery power station equipped with a built-in inverter (to provide AC power) and a charge controller (to accept solar input). It does not "generate" power mechanically like a gas generator; it stores electrical energy generated by external solar panels.
Building a DIY version means sourcing the battery, inverter, and controller separately and wiring them together in a rugged case.
Typical Component Sizing Profiles
The size of your DIY build depends entirely on what you want to power. Here are three common real-world profiles and the components required to build them.
| Build Profile | Battery Capacity | Inverter Size | Solar Charge Controller | Best For |
|---|---|---|---|---|
| The Weekend Camper | 12V 50Ah (600 Wh) | 500W Pure Sine | 20A MPPT | Charging laptops, running a 12V portable fridge, LED lights. |
| The Off-Grid Workhorse | 12V 100Ah (1,280 Wh) | 1,000W - 1,500W | 30A - 40A MPPT | Power tools, coffee makers, CPAP machines, small microwaves. |
| The Home Backup | 24V 100Ah (2,560 Wh) | 2,000W - 3,000W | 60A MPPT | Full-size refrigerators, sump pumps, window AC units (briefly). |
Crucial Details Often Missed in DIY Builds
Many online tutorials skip over the technical nuances that separate a safe, reliable build from a fire hazard. Pay close attention to these factors:
- Connection Order: You must always connect your battery to the charge controller first, before connecting the solar panels. The controller needs to detect the battery's voltage to boot up properly. Connecting solar panels to a controller without a battery attached can fry the controller.
- Inverter Fusing: The wire running from your battery to your inverter carries massive amperage. A 1,000W inverter on a 12V system pulls over 80 amps. You must install an appropriately sized ANL or Class T fuse on the positive cable as close to the battery terminal as possible to prevent catastrophic shorts.
- Ventilation and Heat: Inverters and charge controllers generate significant heat under heavy load. Sealing them inside a waterproof plastic toolbox without ventilation fans will cause them to overheat and shut down, or worse, damage the components.
- BMS Discharge Limits: Every LiFePO4 battery has a Battery Management System (BMS) with a maximum continuous discharge limit (often 100A for a 100Ah battery). If you attach a 2,000W inverter to a single 12V 100Ah battery and run a heavy load, the inverter will try to pull 160+ amps, causing the battery's BMS to instantly shut down the system.
Illustrative Worked Example: Sizing the Wires and Fuses
Let’s calculate the exact wire and fuse sizes for a standard 1,000W DIY build. This is an illustrative example to demonstrate the math behind safe wiring.
The Setup: You are building a 12V system with a 1,000W Pure Sine Wave Inverter and a 12V 100Ah LiFePO4 battery.
Step 1: Calculate Maximum Inverter Amperage To find the maximum continuous current the inverter will draw from the battery, divide the wattage by the lowest battery voltage (typically around 11.5V for a depleted 12V system), and account for 85% inverter efficiency.
- 1,000W ÷ 11.5V ÷ 0.85 = 102 Amps.
Step 2: Size the Wire You need wire that can safely carry at least 102 Amps continuously without overheating. Looking at standard DC wire gauge charts for short runs (under 5 feet):
- 4 AWG pure copper wire is rated for up to 130 Amps and is the minimum safe size.
- 2 AWG pure copper wire is rated for up to 170 Amps and provides an excellent safety margin.
Step 3: Size the Fuse The fuse must be sized larger than the maximum continuous draw (so it doesn't blow during normal use) but smaller than the maximum rating of the wire (so it blows before the wire melts).
- Max draw is 102A. Wire rating is 130A (if using 4 AWG).
- A 125 Amp ANL fuse is the perfect size to protect this circuit.
Practical Checklist for Assembly
When you are ready to put the parts in the box, follow this exact order of operations:
- Layout and Mount: Secure the battery, inverter, and charge controller inside the enclosure so they cannot shift during transport.
- Wire the Controller to Battery: Connect the charge controller to the battery using 10 AWG wire and a 30A or 40A inline breaker. Ensure the controller powers on.
- Wire the Inverter to Battery: Connect the inverter to the battery using heavy-duty 2 AWG or 4 AWG cables, ensuring the large ANL fuse is installed on the positive cable near the battery.
- Install External Ports: Wire any 12V cigarette lighter sockets, USB ports, or Anderson Powerpole solar inputs, ensuring each small circuit has its own blade fuse.
- Connect Solar: Finally, plug your solar panels into the external ports and verify the charge controller is registering the incoming wattage.
FAQs
Can I use a car battery for a DIY solar generator?
You can, but it is highly discouraged. Car batteries are "starter batteries" designed to provide a massive burst of energy for a few seconds. They will quickly degrade and die if you deeply discharge them to run appliances. You must use "Deep Cycle" batteries, preferably Lithium Iron Phosphate (LiFePO4), which can handle thousands of deep discharge cycles.
Is it safe to put the inverter and battery in the same sealed box?
Yes, provided you are using LiFePO4 or sealed AGM batteries. These batteries do not off-gas dangerous hydrogen fumes during normal operation. However, if you are using flooded lead-acid batteries (which require watering), they must be in a separately vented compartment to prevent explosion risks. Regardless of battery chemistry, the box itself needs ventilation fans to cool the inverter.
Do I need to ground my DIY solar generator?
For a truly portable system in a plastic enclosure sitting on the ground, you may run “floating” DC with correct fusing. However, any scenario where the inverter feeds fixed building wiring, an RV electrical panel, or metal chassis needs a deliberate grounding plan. Read the full breakdown in DIY off-grid wiring guide.
Why is my 2,000W inverter shutting down with my 100Ah battery?
A 12V 100Ah LiFePO4 battery typically has a BMS limit of 100 Amps continuous discharge (about 1,200 Watts). If you try to pull 2,000 Watts, the inverter demands over 160 Amps, and the battery's BMS will instantly shut off to protect the cells. To run a 2,000W inverter at full capacity, you need at least two 100Ah batteries wired in parallel, or a single 200Ah battery.
Can I charge the generator from my car while driving?
Yes. You can add a inverter sizing for off-grid solar to the system. This device takes the power from your vehicle's alternator and steps it up to the exact voltage profile needed to safely charge your LiFePO4 battery while you drive.
How do I know what size components to buy?
Start with your loads. Use the WattSizing Calculator to input the appliances you want to run. It will output the exact daily Watt-hours and peak inverter wattage you need, which dictates your battery and inverter purchases.


