Voltage drop is the loss of electrical pressure (voltage) as current travels through a wire, caused by the wire's natural physical resistance. In a solar power system, excessive voltage drop wastes your generated energy as heat and can cause charge controllers to chronically undercharge your expensive battery bank. To prevent this silent efficiency killer, you must use appropriately thick copper wiring, keep cable runs as short as physically possible, or increase your system's transmission voltage.
You've purchased high-efficiency solar panels, a top-of-the-line MPPT charge controller, and premium lithium batteries. You wire everything up, wait for a sunny day, and check your monitoring app—only to find that your system is producing 10% to 15% less power than it should be. That energy didn't vanish; it was lost to voltage drop.
In this comprehensive guide, we will explain exactly what voltage drop is, why it happens, how to calculate it, and how to eliminate it. If you want to skip the manual math, you can use our free solar calculator to automatically size your wires for minimal voltage drop.
What is Voltage Drop?
To understand voltage drop, it helps to think of electricity like water flowing through a hose:
- Voltage (Volts): The water pressure pushing the flow.
- Amperage (Amps): The volume of water actually flowing.
- The Wire: The hose itself.
No wire is a perfect conductor; all wires have a certain amount of internal resistance. As electricity travels down the wire, it has to fight against this resistance. The longer the wire, and the thinner the wire, the more resistance the electricity encounters.
As the electricity fights through this resistance, some of the "pressure" (Voltage) is lost as heat. Therefore, the voltage measured at the end of the wire will always be lower than the voltage measured at the beginning of the wire. This difference is the voltage drop.
Why is Voltage Drop a Problem in Solar?
- Lost Power (Watts): Power (Watts) is calculated by multiplying Voltage by Amps (W = V x A). If your voltage drops, your total wattage drops. You are literally throwing away the solar energy you generated, turning it into useless heat in your cables.
- Improper Battery Charging: This is the most severe consequence. A charge controller relies on precise voltage readings to know when a battery is full. If there is a high voltage drop between the controller and the battery, the controller will read a higher voltage than the battery is actually receiving. It will prematurely switch to "Float" mode, leaving your batteries chronically undercharged.
- Inverter Shutdowns: Inverters have a low-voltage disconnect (LVD) feature to protect batteries. If the voltage drop between the battery and the inverter is too high under heavy load, the inverter will sense a low voltage and shut down, even if the battery is fully charged.
The Golden Rules of Solar Voltage Drop
In the solar industry, there are strict guidelines for acceptable voltage drop percentages to ensure maximum efficiency and equipment safety.
- Solar Panels to Charge Controller (Max 2% to 3%): The wire run from your roof to your charge controller is usually the longest in the system. Because modern MPPT charge controllers can handle high voltages, you have a little more leeway here. Aim for a maximum voltage drop of 2%, though up to 3% is acceptable for very long runs.
- Charge Controller to Battery Bank (Max 1%): This is the most critical wire run for battery health. Because the controller needs exact voltage readings to charge the batteries properly, the voltage drop here must be kept to an absolute minimum. Keep the controller as physically close to the batteries as possible (ideally under 3 feet) using thick wire.
- Battery Bank to Inverter (Max 1% to 2%): Inverters pull massive amounts of current (Amps). High current exacerbates voltage drop significantly. To prevent the inverter from shutting down under heavy loads, keep this drop under 2%. This requires very thick, short cables (often 2/0 or 4/0 AWG).
Crucial Wiring Factors Often Overlooked
Many basic guides simply tell you to "buy thicker wire," but real-world solar wiring involves several nuanced factors that can introduce hidden resistance:
- Copper-Clad Aluminum (CCA) vs. Pure Copper: Many cheap cables sold online are CCA—aluminum wire coated in a thin layer of copper. Aluminum has significantly higher resistance than pure copper. If you use CCA wire, you must upsize the wire by at least one or two full AWG sizes to achieve the same voltage drop performance as pure copper. Always verify you are buying 100% pure stranded copper.
- Hidden Resistance at Terminals: Voltage drop doesn't just happen in the wire itself; it happens at every connection point. A poorly crimped lug, a loose screw terminal, or a corroded battery post can introduce massive resistance, causing severe localized voltage drop and dangerous heat buildup.
- Temperature Ratings matter: As wire heats up (either from ambient temperature or from carrying current), its resistance increases, which in turn increases voltage drop. Using wire with high-temperature insulation (like THHN rated for 90°C) allows the wire to safely handle more current, but it does not change the physical resistance of the copper itself.
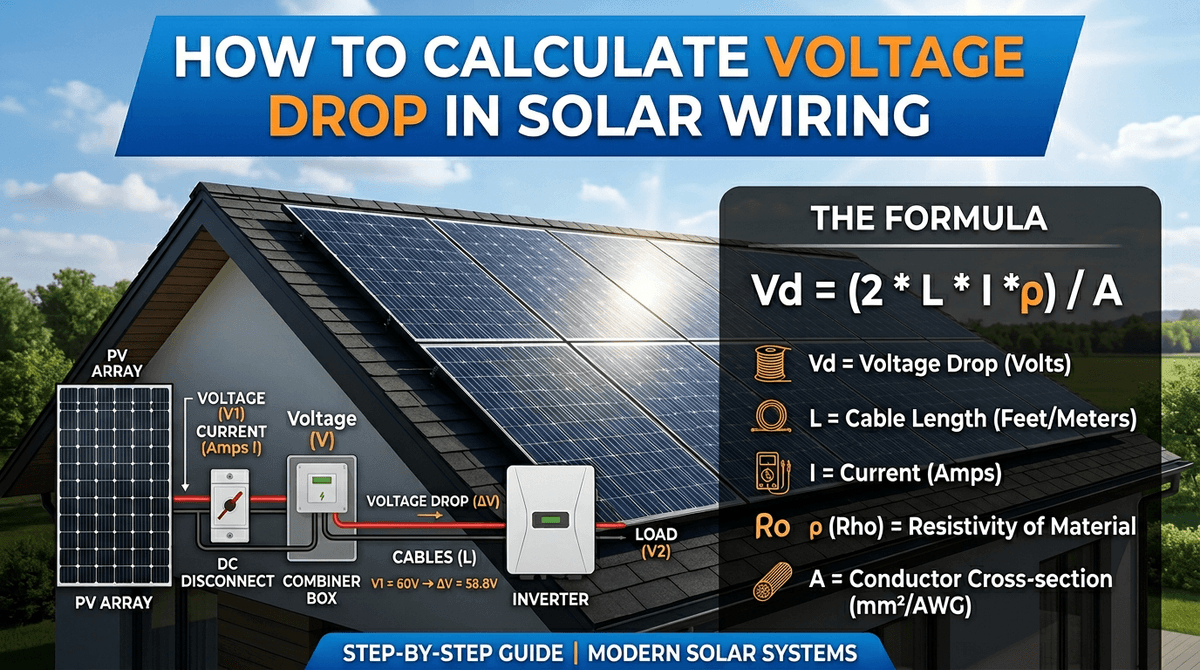
How to Calculate Voltage Drop (The Formula)
Calculating voltage drop manually requires knowing four variables:
- Current (Amps): The maximum amps flowing through the wire.
- Length of the Wire (Feet): The one-way distance of the wire run.
- System Voltage: The operating voltage (e.g., 12V, 24V, 48V, or the Vmp of your solar array).
- Wire Resistance: The resistance of the specific wire gauge (AWG) per 1000 feet (found in NEC Chapter 9, Table 8).
The Voltage Drop Formula:
Voltage Drop = (2 x Length x Current x Resistance per 1000ft) / 1000
The Percentage Formula:
Voltage Drop % = (Voltage Drop / System Voltage) x 100
Illustrative Example: Sizing a 60-Foot Solar Array Run
Let's say you are building an off-grid cabin. Your solar array produces 20 Amps at 18 Volts (Vmp). The panels are located 60 feet away from your charge controller. You are considering using standard 10 AWG copper wire.
- Step 1: Find the resistance. According to NEC tables, stranded 10 AWG copper wire has a resistance of roughly 1.24 ohms per 1000 feet.
- Step 2: Apply the formula. Voltage Drop = (2 x 60ft x 20A x 1.24) / 1000 Voltage Drop = (2976) / 1000 Voltage Drop = 2.97 Volts
- Step 3: Calculate the percentage. Voltage Drop % = (2.97V / 18V) x 100 Voltage Drop % = 16.5%
The Result: A 16.5% voltage drop is catastrophic. You are losing a massive amount of solar energy to heat.
The Solution: Increase the Voltage. Instead of buying incredibly expensive, thick wire to fix this, you can change how the panels are wired. If you wire those same panels in series instead of parallel, the voltage adds up while the amperage stays the same.
Let's say wiring them in series changes the array to 5 Amps at 72 Volts (Vmp). Using the exact same 10 AWG wire:
- Voltage Drop = (2 x 60ft x 5A x 1.24) / 1000 = 0.74 Volts.
- Percentage = (0.74V / 72V) x 100 = 1.0%.
By simply changing the array to a higher voltage, the voltage drop plummeted from an unacceptable 16.5% to a perfect 1.0%, without spending a dime on thicker wire!
Practical Checklist for Solar Wiring
Before you buy spools of expensive copper cable, run through this checklist:
- Measure True One-Way Distance: Measure the exact path the wire will take, including bends, drops, and routing through walls. Do not just measure the straight-line distance.
- Calculate Maximum Amperage: For solar panels, use the Short Circuit Current (Isc) multiplied by 1.25 for safety. For inverters, divide the continuous wattage by the lowest battery voltage.
- Check Terminal Lug Sizes: Ensure the thick wire you plan to buy will actually fit into the terminals of your charge controller or breaker box. You may need specialized pin-terminals to step down thick wire.
- Use Pure Copper: Verify that your wire is 100% pure copper, not Copper-Clad Aluminum (CCA).
- Invest in a Hydraulic Crimper: A poor crimp on a battery cable introduces massive resistance. Use a proper hydraulic hex crimper for all large gauge wire lugs.
FAQs
Does voltage drop happen on AC wiring too?
Yes. Voltage drop occurs on both DC (Direct Current) and AC (Alternating Current) wiring. However, because the AC power coming out of your inverter is high voltage (120V or 240V) and relatively low amperage, voltage drop is rarely an issue for standard household wire runs under 100 feet. It is primarily a major concern on the low-voltage, high-amperage DC side of your solar system.
Can voltage drop cause an electrical fire?
Extreme voltage drop means the wire is acting as a resistor and generating heat. While the voltage drop itself won't start a fire, the heat generated by pushing too many amps through a wire with high resistance absolutely can melt the wire's insulation, short out, and cause an electrical fire. This is why proper wire sizing and fusing are mandatory.
Why does my inverter beep and shut off when I run the microwave?
This is a classic symptom of severe voltage drop between the battery and the inverter. When the microwave starts, it pulls a massive surge of amps. If your battery cables are too thin or too long, that surge creates an instantaneous voltage drop. The inverter's internal sensors read this low voltage, assume the battery is dead, and shut down to protect the system. Upsizing your battery cables and keeping them under 3 feet will usually fix this.
Are online voltage drop calculators accurate?
Yes, most online calculators use standard National Electrical Code (NEC) formulas and are highly accurate. However, they are only as accurate as the data you input. You must ensure you are using the correct maximum amperage and the exact one-way wire distance.
Is it better to upsize the wire or increase the system voltage?
Increasing the system voltage (e.g., building a 48V battery bank instead of a 12V bank, or wiring solar panels in series) is almost always the superior choice. Higher voltage proportionally lowers amperage, which drastically reduces voltage drop and allows you to safely use much thinner, cheaper wire.
Conclusion
Voltage drop is an unavoidable law of physics, but it doesn't have to ruin your solar system's performance. By understanding the relationship between wire length, thickness, amperage, and voltage, you can design a system that minimizes resistance and maximizes power delivery.
Always aim for less than a 3% drop from your panels to your controller, and less than a 1% drop between your controller, batteries, and inverter. When in doubt, wire your solar panels in series to increase voltage, build a 24V or 48V battery bank, and never hesitate to upsize your pure copper wiring.
Ready to perfectly size your wires without doing the manual math? Head over to the WattSizing Calculator to get instant, accurate wire gauge recommendations for your entire off-grid or grid-tied solar system!


